DIY Dry Snow Globes -Homemade Christmas Gift Ideas
Homemade snow globes make great Christmas gifts for friends, family or teachers. This DIY Dry globe is an easy craft that little kids can help make this holiday season.
All you need for these waterless snow globes is some fake snow, a hot glue gun, bottle brush trees, and some small Christmas buttons. Let your kids choose what goes in each waterless snowglobe for an extra personalized touch.
If you want to fill the jar with snow these can also be made into some great Christmas sensory bottles. Get the Christmas music playing and let’s get started on this great project for winter. 
This post contains affiliate links. If you use these links to buy something we may earn a commission (at no cost to you). Thanks for the support! See our Disclosure page.
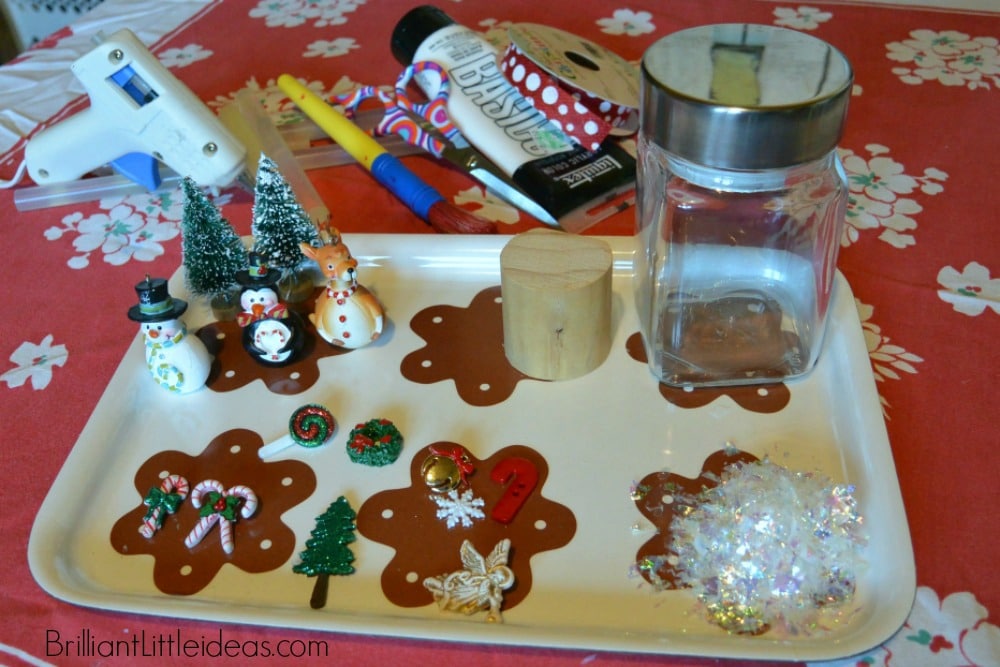
What you will need
- Small Glass Jars
- Ribbon for the lid of the jar
- Small ornaments
- Small trees
- Small snowflakes,
- Candy Canes, or whatever looks cute
- Snowflakes confetti, or
- Tiny Stryraphone Snowballs that will work for snow in your jar
- Glitter to mix with your snow
- White paint
- Paintbrush
- 1/2 in dowel rod (or a size that will fit well in the lid and the jar can screw on)
- Hot Glue gun and glue sticks
- Scissors
- Saw to cut your dowel rods
- Pliers to remove the ornament hooks
How Do You Make a Dry Snow Globe
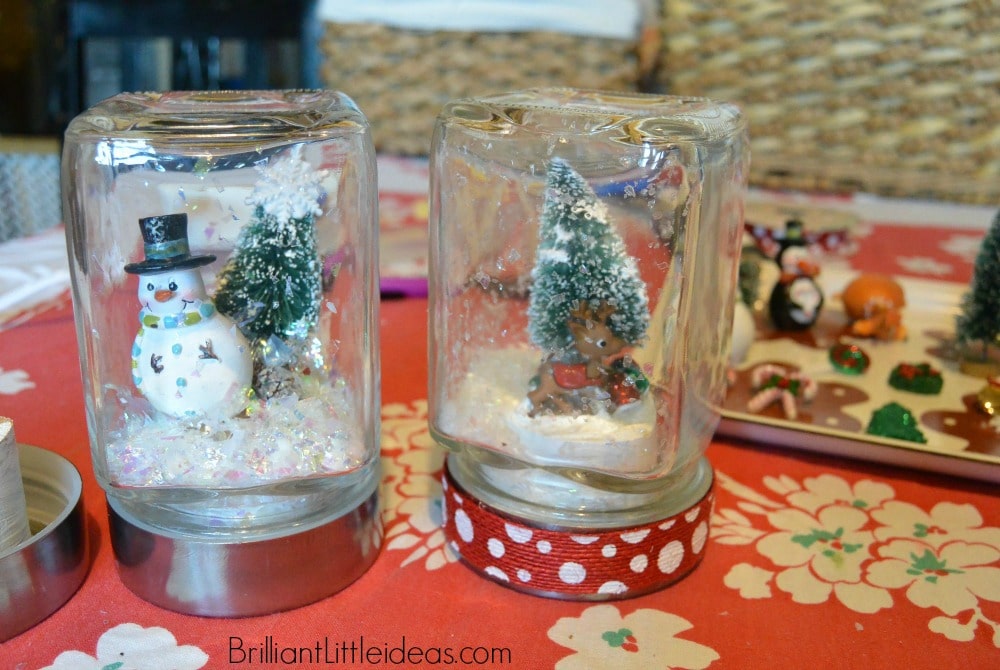
Traditional snow globes have drops of glycerin in distilled water to make the snow float. These simple snow globes are dry meaning they are waterless. The jars will be set upside down to show the pretty scene you created. Give it a little shake and watch the snowy scene come to life.
- Choose a small jar and remove the lid.
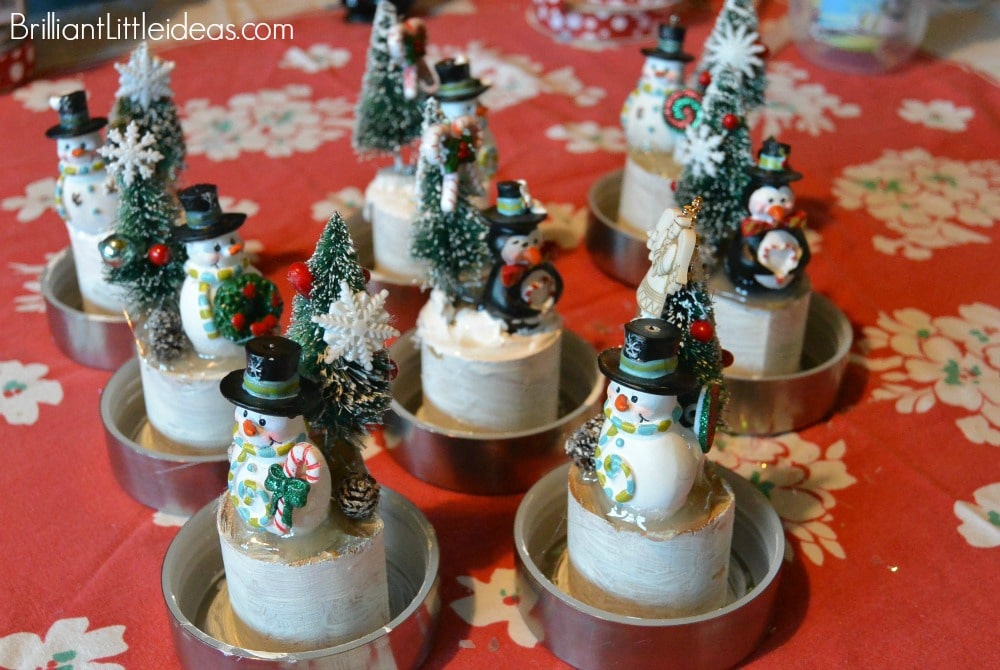
- Decide what you want the Winter Scene to look like then hot glue small ornaments, buttons, and trees to the lid.
- Paint the lid white if you want the exposed lid to be white. Let dry.
- Depending on the size of your jar you will need to add fake snow. If you have a small jar start out with just a tbsp if that isn’t enough add a few more until the desired amount is reached.
- Put the lid on the jar and give the jar a good shake to distribute the snow. If you want the snow globe to stay on glue the lid to the jar and make sure to leave the snow globe lid side up until that glue is dry.
- Add a ribbon to the edge of the jar for an extra Christmas touch.
First, check the size of the jar that you chose. Do you need something to make the scene a little taller to see it through the jar or will the lid of the jar be fine? I picked up needed a little height to it so I added a piece of the dowel rod to the inside of the mason jar lid. I used a hot glue gun but you could also use E6000 to secure the dowel as the base of the snow globe.
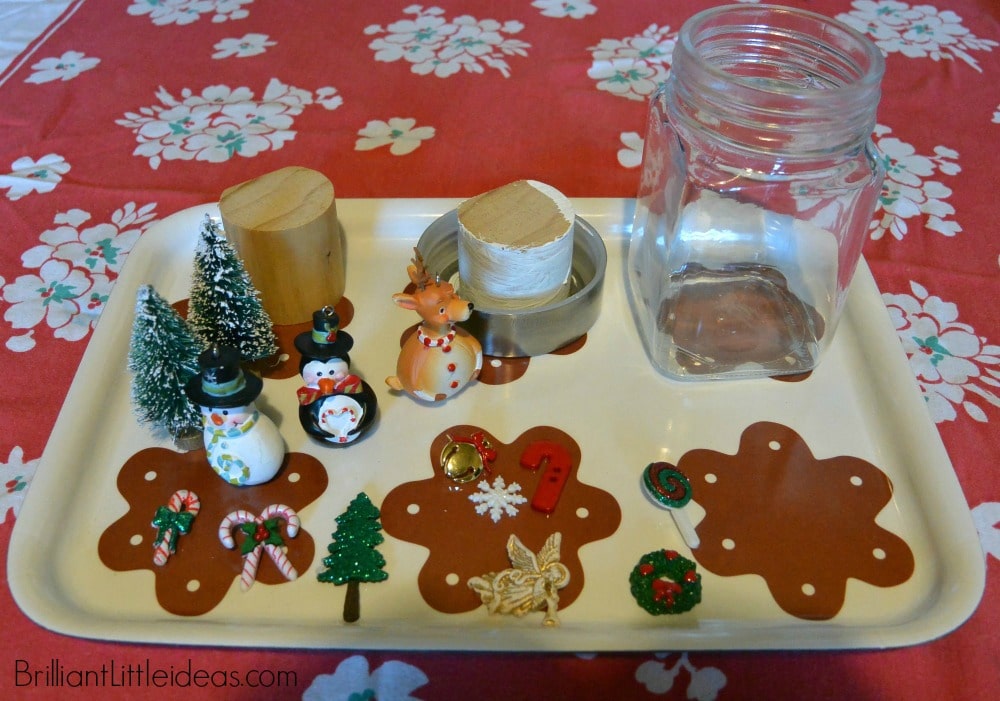
Dowel rods can be to be a little tricky. You will need to cut them to an adequate size for your jars. To do this measure how tall your ornaments are and how high you want them to be in your mason jar snow globes. Make sure you can see your pretty scene and it isn’t too low or high. Once your dowels are cut they will need to be painted white to blend in with the snowflakes, dry then secure with a hot glue gun.
You can paint the inside of the lid white to cover any silver that might show through. Just grab some white paint, a paint brush, and paper plate.
Add some glitter spray paint on top of the white paint for a little sparkly fun. You can also use some spray adhesive to permanently attach some fake snow to the base.
Have fun while creating your own snow globe. It’s okay for it to not be perfect just make sure you have the person in mind when making a Christmas snow globe.
Check out your local craft store like Hobby Lobby for small ornaments, cute buttons, or small trees.
What Do You Put In a Dry Snow Globe
For this DIY snow globe project, you will need things to make a cute winter scene. Different Colors can be used or go with an all one or two colored theme. A white Christmas with all white inside would be a beautiful Christmas gift. Coming up with your own snow globe idea is definitely the fun part of this project. Check local thrift stores for some inexpensive things to put inside of your dry snow globe this Christmas season like old advent calendar pieces.
Kids of all ages will love choosing what goes in the bottom of the snow globe. Here is a list of fun things to put inside these easy DIY snow globes.
- Tiny Toy Figurines
- Christmas Buttons
- Small Ornaments
- Tiny Bottlebrush Trees
- Old Advent Calendar Pieces
- Small Christmas Tree
- Cotton Ball Snowman
- Small Christmas Ornaments
- Glitter
- Fake Snow

If you’re really crafty you can make your own homemade snow globe ornaments to go inside of the dry snowglobe. You can use polymer clay, little wood pieces that have been painted or just create your own fun craft for the inside of the jar lid.
It’s a good idea to make sure it can withstand being shaken and the snowfall that will land on it. So don’t use regular paper or tissue paper as the winter scene.
After securing the lid on the mason jar has a tight seal let it dry upside down for a half hour to be 100% sure that everything in the snow globe container is completely dry. Drying time will vary hot glue is fast but E6000 takes around 24 hours to set.
Lastly, don’t forget your ribbon! Choose something that goes with your own winter wonderland you have created.
And DONE! Aren’t they cute and so fun to shake?
These Dry Snow Globes would be cute on the dining table or on end tables as decoration.
Have you ever made dry snowglobes?