
Easy Christmas Tree Brownies Kids Can Make
Kids will love making these Easy Christmas Tree Brownies for an upcoming holiday party or cookie exchange. With just a few ingredients and a little creativity, you can create the hit of the Christmas party! Each Christmas tree has a yummy candy cane trunk for the kids to hold and eat. Bring some holiday spirit everywhere you go with these tree shaped treats.
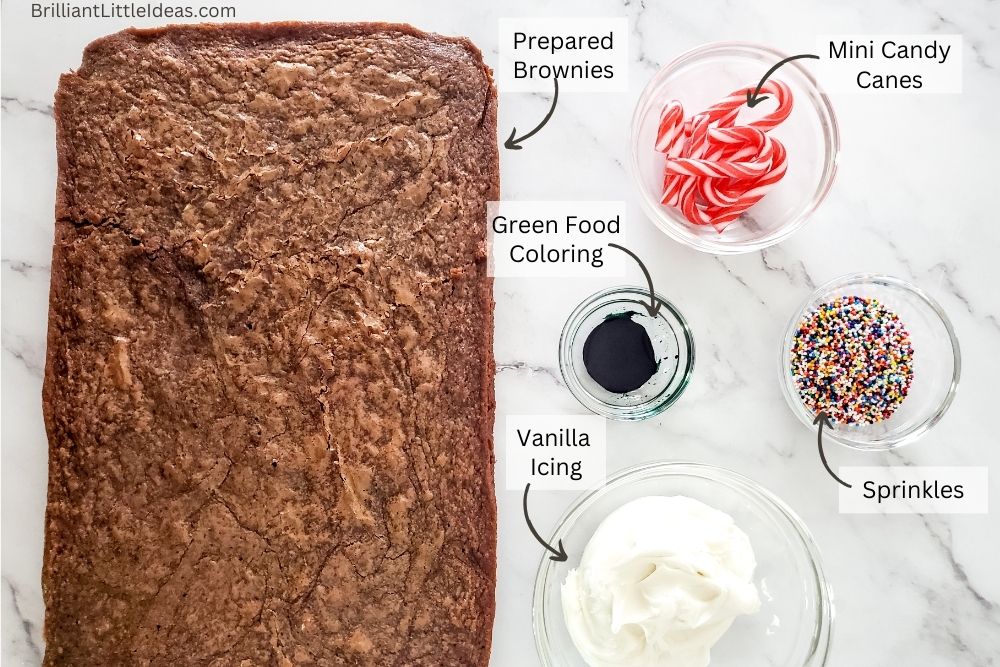
These festive Christmas tree brownies are so simple to make, all you need are candy canes, icing, food coloring, brownies, and sprinkles. The best part of these adorable Christmas tree brownies is that you can make them from scratch, premade, or a store-bought box brownie mix. Get the full printable recipe below along with all of my easy to follow how to pictures.
Make some memories with your whole family using this fun Christmas Dice Game. Simple to download and print for an evening of fun and laughter.
Jesus is our main celebration at Christmas and these Advent Activities for Kids are a perfect addition to your holiday season. We love finding different ways to instill God’s love for us any time of year but around Christmas seems so much more special.
Need another deliciously easy idea for kids’ party food? Mini M&M’s Nutella Cups are my new go-to treat. Made with just 3 ingredients this recipe is sure to be the hit of the party!

This post contains affiliate links. If you use these links to buy something we may earn a commission (at no cost to you). Thanks for the support! See our Disclosure page.
What You Need to Make Easy Christmas Tree Brownies
- Prepared brownies (either homemade or box mix)
- Mini candy canes
- Prepared Vanilla Frosting (your favorite frosting or canned frosting)
- Green food coloring or green gel coloring
- Nonpareil Sprinkles
- Piping Bag Set
- Petal Piping Tip
- Parchment Paper
You can find most of the supplies at your local grocery stores. I have most of the items linked for you to see exactly what was used to create these cute holiday Brownies.
How to Make Christmas Tree Brownies
Start with a prepared pan of brownies at room temperature. You can choose fudgy brownies or cake like brownies for your Christmas tree base. The fudge-type chewy brownie will hold together a little better than the cake type because of the density. If you love cake brownies just serve them on a plate they are just as good, you just can’t carry them without them falling apart.
Store-bought brownie mix or prepared, gluten-free boxed mix or homemade brownies are all fine to use and work well with this recipe. Choose your favorite or what time allows. I chose a box of brownie mix for ease. Be sure to use brownies that are completely cooled. **Be sure to use parchment paper in the baking pan before pouring in the brownie batter. This will ensure the removal of the brownies and make them easier to cut.
USA Pan Allergy Id Nonstick Sheet Cake, 9 x 13 Rectangular Pan, PurpleGold Star Shinny Metallic Sequin Confetti Sprinkles for Cakes and Cupcakes 4 oz
AmeriColor, Forest Green.75 Ounce Bottle, Soft Gel Paste Food Color
Unbleached Parchment Paper for Baking – 15 in x 210 ft 260 Sq.Ft Baking Paper Roll with Cutter, Non-Stick Brown Parchment for Baking, Cooking, Grilling, Steaming and Air Fryer by Baker’s Signature
Christmas sprinkles | Sprinkles | Christmas jimmies | Cookie sprinkles
USA Pan Allergy Id Nonstick Jelly Roll Baking Pan, Purple


Now we are going to cut the tree shape from a 9×13 pan of cooled brownies. First, cut the brownies in half lengthwise and then either eyeball it or use a ruler to cut each tree base at about 2 inches. Keep cutting back and forth until you have the first row finished. Then, move on the the second half and cut it the same way. It’s fine if they aren’t perfect, we are icing them next and the kids will love eating these yummy brownies. Remove your triangle shapes and set aside on a parchment lined jelly roll pan.
Once you have each brownie cut then it’s time to add in the tree trunk. This can be done later in the process but it’s easier to add the candy cane before the tree has been iced.
To add the candy cane base to the brownie Christmas trees, get small candy canes and break the loop off of the top. Then gently push the candy cane into the bottom of the brownies. Try to center it in the middle but if it’s a little off no worries, they will still be an adorable treat for a party or Christmas dinner.
Candy Canes not staying in? The easiest way to make them stick is to melt some white chocolate chips, regular chocolate chips, almond bark, or candy melts. When you have your melted chocolate ready, simply dip the end of the candy cane into the melted chocolate and push the candy cane into the bottom of the triangle shape. Let it cool and it should harden and not come out.
If your chocolate sizes up just add a few dops of vegetable oil and the chocolate will smooth back out. This tends to happen to the candy melts more than chocolate chips or almond bark.

To make the green frosting you need 1 1/2- 2 cups prepared white frosting. It can be again store bought or homemade icing the choice is yours. Put white icing in a medium or large bowl, really just big enough for the kids to help you stir in the green food dye without getting it all over the place. I have found that deep sides on a larger bowl work well for kids’ aggressive stirring. If its just you mixing the vanilla icing then a small bowl should work just fine.
Cakebe Cake Decorating Tools 115-Piece Piping Bags&Tips Set Cake Decorating Kit with 42 Piping Tips Cake Decorating Supplies with Frosting Tips&Bags Cupcake Decorating Kit Cookie Decorating SuppliesRFAQK 74 PCs Icing Piping Bags and Tips Set, Cake Decorating Kit with 48-Numbered Piping Tips, 20+1 Pastry Bags for Cookie Cupcake Cake Decoration, Cake Decorating Tips Set with Booklet and E-book
Each drop of green food coloring will darken the icing so start with 4 or 5 and then work your way to the dark green you like. Be sure to completely mix the dye in before adding more drops. It all just depends on how dark you want your brownie tree to be.
You can make the icing early and store it in the fridge in an airtight container. This time of year I use quite a bit of frosting. So if you have leftovers you can keep it to make some sugar cookies with.

What can I use instead of a Piping Bag?
Piping bag, pastry bag, or ziploc bag? I own all three, however, my go-to is usually a zip-top storage bag because of its easy cleanup.
A pastry bag will work in a pinch but it’s more for filling doughnuts, piping whipped cream, or meringue. Piping bags are used mainly for icing and comes with more tips than a pastry bag. I have a full set but can’t ever remember where I put it last.
What do I use instead of a piping bag? I use a ziplock bag. The size you choose will depend on how much icing you need to pipe out. If you have a lot go with a quart or gallon bag but if it’s just a little bit then a sandwich bag will work just fine.
Spoon in the icing and securly zip the top removing as much air as you can in the process. Push the icing to one side and cut a small triangle off of the edge. Be sure to start small, you can always cut more but you can’t put it back. Gently squeeze a little icing out of the bag to see if it’s enough, if not cut a little the edge a little more.
How to Ice a Chrismas Tree Brownie
When you have your icing colored you’re ready to start piping. Use the petal piping tip in the piping bag and spoon the green icing in the icing. Twist the top of the bag and let’s get decorating. Slowly pipe the frosting onto the base of the brownies going row by row until you reach the top of each tree. This will give the tree a full layered look.
Do this to all the brownies until you have every one of the trees iced. Set each finished tree onto a parchment paper lined jelly roll pan or cookie sheet. Easy Christmas recipes are so much fun for kids to help with and make some great memories or new traditions. If your kids are old enough give them the ingredients and let them put the icing and sprinkles on themselves.

This perfect dessert is one of the easiest ways to turn an ordinary brownie or boring brownies into new Christmas tree brownies. Each tree can be decorated with colorful sprinkles, like these nonpareil sprinkles.
Use enough Christmas sprinkles to make your perfect treat decorated like a real tree. You can even add a star sprinkle at the top or use a star tip in the piping bag to make a bright star.
How the Candy Cane Got Its Stripes: A Christmas TaleI See Santa Everywhere
The Nativity Story for Toddlers and Kids: The Christmas Book with Simplified Classic Bible Jesus’ Birth Story and Cute, Large Pictures (Christian Stories for Children)
The Candy Cane Fiasco: A Christmas Storybook Filled with Humor and Fun (A Wee Bit Sticky)
The First Christmas Night
Adventures in Candy Cane Village: A Christmas Story


If you haven’t already go ahead and add your candy cake tree trunks. This is easier before you put the icing on these adorable Christmas trees but can be done now too. Simply snap off the loop and gently push the candy cane into the bottom of the brownie.

These fun treats will bring joy to your kid’s faces all winter break. I love to make them the whole holiday season sometimes even using a Christmas tree cookie cutter for the cake-like brownies. Pour over some Royal Icing like this recipe and decorate the cute Christmas tree brownies just like these tree brownies.
The options are endless. Let your kids have fun making their new favorite holiday treats to enjoy while watching a fun Christmas movie with the whole family.
Download the recipe below.

Easy Christmas Tree Brownies Kids Can Make
Ingredients
- 1 9 x 13 pan Prepared brownies (and cooled)
- 1 Candy cane per brownie tree
- 1 1/2 -2 cups Premade frosting (canned is fine)
- 1 bottlle Green food coloring
- 1 jar Christmas sprinkles or nonpareil sprinkles
Instructions
-
Using prepared and cooled brownies. To make the trees, cut triangles by cutting the brownies in half lengthwise, and then cut each half into 10 even triangles – about 2” spaced on the bottoms of the triangles.
-
Gently break the loop off of the candy canes and insert the candy into the base to make the “tree trunk”. Be careful not to break the brownie.
-
Pull out about 1 1/2 cup of frosting. I like to reserve some plain frosting in case I need to add more frosting after mixing the coloring in the frosting. Add food coloring to get your desired color. Start with a little bit of coloring, and add more as you mix. If you see it get too dark you can add more frosting back in, but you should be good if you add a little at a time and mix well.
-
Put a petal piping tip inside a piping bag and add the prepared frosting. If you don't one just use a sandwich ziplock bag and cut a small edge off of it to use for piping.
-
Start at the bottom of the tree and frost row by row. Piping the icing slowly as you go. Put the open part of the tip to be facing the base of the tree to give it a full look or if using a ziplock bag just make wave lines for each row of tree branches.
-
Once you're finished frosting the trees, sprinkle the nonpareil sprinkles or christmas sprinkles on top of the frosting. Now you're ready to serve.

Enjoy this easy holiday treat with some hot chocolate or hot cocoa. I hope your family has a Merry Christmas!

Dehydrated Peeps
Dried peeps can be enjoyed all year long with this easy recipe.
Easy Bunny Bait Snack
Easy to make and delicious to eat. Kids can help make this recipe.
Easter Basket Ideas
Simple Easter ideas that your kids will love!